Installing Laminate Flooring on Walls: A Comprehensive Guide
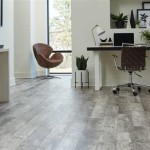
Laminate flooring, traditionally designed for horizontal surfaces, is increasingly finding its way onto walls as a cost-effective and aesthetically pleasing alternative to traditional wall coverings like paint, wallpaper, or tile. The installation of laminate flooring on walls can create a visually striking feature, adding texture, depth, and a contemporary feel to any room. While the process shares similarities with installing laminate on floors, certain adaptations and considerations are necessary to ensure a secure and visually appealing outcome. This article provides a detailed guide on how to install laminate flooring on walls, covering preparation, installation techniques, and troubleshooting tips.
Before embarking on a laminate wall installation project, it is crucial to assess the suitability of the wall and the type of laminate being used. Not all walls are ideal candidates. Uneven surfaces, excessive moisture, or load-bearing structures can complicate the installation process and potentially compromise the integrity of the laminate. Similarly, the thickness and construction of the laminate itself play a significant role in its suitability for vertical application. Thicker, more rigid laminates are generally easier to work with, while thinner laminates may require additional support or adhesives.
Proper preparation is paramount for a successful laminate wall installation. This includes gathering the necessary tools and materials, preparing the wall surface, and acclimating the laminate to the room's environment. Neglecting any of these steps can lead to installation challenges and potentially affect the long-term durability of the finished wall.
Key Point 1: Preparation is Key
The success of any laminate wall project hinges on meticulous preparation. This phase involves several critical steps that must be addressed before any laminate panels are actually affixed to the wall. These steps include gathering tools and materials, preparing the wall surface, and allowing the laminate flooring to acclimate to the room’s environment.
Tools and Materials: A well-equipped workspace will streamline the installation process. Essential tools include a measuring tape, level, pencil, stud finder, circular saw or laminate cutter, jigsaw (for intricate cuts), safety glasses, dust mask, construction adhesive, brad nailer (optional), spacers, and shims. The primary materials are the laminate flooring itself, construction adhesive specifically designed for laminate, and potentially furring strips or plywood underlayment, depending on the wall's condition.
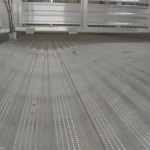
Wall Preparation: The wall surface must be clean, dry, and relatively even. Remove any existing wallpaper, loose paint, or debris. Repair any significant holes or cracks with patching compound and sand smooth. If the wall is severely uneven, consider installing furring strips or a plywood underlayment to create a flat, consistent surface. Furring strips are typically wood strips attached horizontally to the wall studs, providing a framework for securing the laminate. Plywood underlayment offers a solid, seamless surface. Ensure the chosen underlayment is suitable for interior wall applications and is properly secured to the studs.
Acclimation: Laminate flooring is susceptible to expansion and contraction based on humidity and temperature fluctuations. Acclimation involves storing the laminate planks in the room where they will be installed for at least 48 to 72 hours prior to installation. This allows the laminate to adjust to the room's environmental conditions, minimizing the risk of warping or buckling after installation. Position the laminate boxes in the room and open them slightly to allow for air circulation.
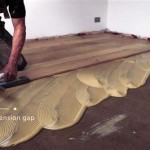
Careful measurement and planning are essential to ensure a professional-looking finish. Determine the desired layout of the laminate panels on the wall. Consider the orientation (horizontal or vertical) and the pattern (staggered or uniform). Use a level and measuring tape to mark the placement of the first row of panels, ensuring it is perfectly level. This first row will serve as the foundation for the entire installation. If the ceiling or floor is not perfectly level or square, adjustments may be necessary to avoid a visually skewed appearance. The amount of adhesive required will depend on the type of adhesive and the surface area of the laminate. It is always better to err on the side of caution and purchase slightly more adhesive than initially estimated.
Key Point 2: Installation Techniques
With the preparation phase complete, the installation process can begin. This involves applying adhesive, positioning the laminate panels, securing them to the wall, and cutting panels to fit around obstacles. This section details the recommended techniques for each of these steps.
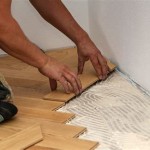
Applying Adhesive: Use a construction adhesive specifically designed for laminate and drywall or the chosen underlayment. Apply the adhesive to the back of the laminate panel in a serpentine pattern, ensuring adequate coverage, especially along the edges and corners. Follow the adhesive manufacturer's instructions regarding application rate and drying time. Avoid applying excessive adhesive, as this can lead to squeeze-out and make it difficult to reposition the panel.
Positioning and Securing Panels: Carefully position the first laminate panel against the marked line, ensuring it is level and aligned correctly. Press the panel firmly against the wall to ensure good contact with the adhesive. For added security, consider using a brad nailer to temporarily secure the panel while the adhesive cures. Space the brad nails evenly across the panel, avoiding the edges to prevent chipping. Use spacers to maintain consistent gaps between panels, allowing for expansion and contraction. Subsequent panels should be installed in the same manner, ensuring they are tightly butted against the adjacent panels. Some laminate systems feature interlocking edges, which should be carefully engaged to create a seamless connection.
Cutting Panels to Fit: Inevitably, some laminate panels will need to be cut to fit around corners, outlets, or other obstructions. Use a measuring tape and pencil to accurately mark the cut lines on the panel. A circular saw or laminate cutter is suitable for straight cuts, while a jigsaw is ideal for intricate shapes. When using a circular saw, always cut with the finished side facing up to minimize chipping. Wear safety glasses and a dust mask to protect yourself from debris. After cutting, smooth any rough edges with sandpaper or a file.
Working Around Obstacles: Cutting laminate around outlets, pipes, or other obstructions requires precision. Use a template or a contour gauge to accurately transfer the shape of the obstacle onto the panel. Cut along the marked lines with a jigsaw, taking care to avoid overcutting. Test-fit the panel before applying adhesive to ensure a proper fit. Consider using trim or molding to conceal any gaps or imperfections around the obstacle.
Dealing with Corners: To navigate corners, use a miter saw to create precisely angled cuts. Measure the angle of the corner with a protractor and set the miter saw to the appropriate angle. Cut two panels that, when joined, will create a seamless corner. Secure the panels with adhesive and brad nails.
Key Point 3: Addressing Challenges and Troubleshooting
Despite careful planning and execution, challenges can arise during the laminate wall installation process. This section addresses common problems and provides troubleshooting tips to help overcome these obstacles.
Uneven Walls: If the wall surface is significantly uneven, installing furring strips or plywood underlayment is the most effective solution. However, for minor imperfections, shims can be used to level individual panels. Insert shims behind the panels at strategic locations to create a flat, even surface. The shims can be trimmed flush with the wall after the adhesive has cured.
Adhesive Issues: If the adhesive is not bonding properly, ensure that the wall surface is clean and free of debris. Check the adhesive's expiration date and ensure that it is being applied at the recommended temperature. If the adhesive is drying too quickly, reduce the room's temperature or use a slower-setting adhesive. If the adhesive is squeezing out excessively, reduce the amount of adhesive being applied.
Panel Slippage: If the laminate panels are slipping or sliding down the wall before the adhesive cures, use a brad nailer to temporarily secure them. In addition, use shims to support the bottom row of panels until the adhesive has set. Ensure that the panels are properly aligned and level before securing them.
Gaps Between Panels: Gaps between panels can occur if the panels are not properly butted together or if the wall is uneven. Use a tapping block and hammer to gently tap the panels together, ensuring a tight fit. If the gaps persist, consider using a color-matched sealant to fill them.
Moisture Concerns: Laminate flooring is not waterproof, and excessive moisture can cause warping and damage. Avoid installing laminate in areas with high humidity, such as bathrooms or laundry rooms, unless the laminate is specifically designed for these environments. Ensure that the wall is properly sealed and waterproofed before installing the laminate.
Aesthetic Imperfections: Minor imperfections, such as small gaps or slightly misaligned panels, can be concealed with trim or molding. Choose trim that complements the laminate's color and style. Install the trim along the edges of the wall, around corners, and around any obstacles.
In summary, installing laminate flooring on walls is a project that requires careful planning, precise execution, and attention to detail. By following the steps outlined in this guide, you can achieve a visually stunning and durable laminate wall that enhances the aesthetic appeal of any space. Remember to prioritize safety, use the appropriate tools and materials, and take your time to ensure a professional-looking finish.

How To Install Laminate Flooring On Walls 7 Easy Steps Inc

How To Horizontally Install Pergo Laminate Flooring On Your Walls

How To Install Laminate Flooring On Walls 7 Easy Steps Inc

How To Install Laminate Flooring On The Wall

Going Up The Wall Installing Flooring Vertically Floor Trends Installation

How To Install Laminate Flooring On Walls And Ceilings

How Should Laminate Flooring Be Installed On A Wall

How To Install A Laminate Wood Wall Citygirl Meets Farmboy

Home Dzine Improvement Create A Feature Wall With Laminate Flooring

How To Install Wood Flooring On The Wall Esb
Related Posts